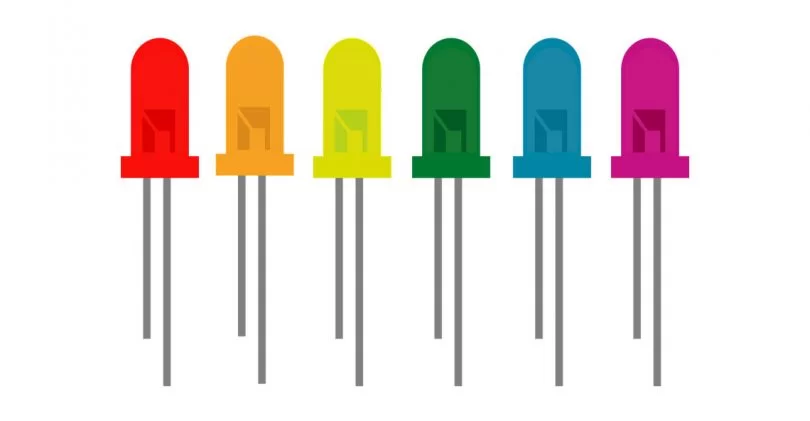
Light Emitting Diodes (LEDs) are everywhere around us—in our homes, cars, and even our smartphones. Available in various shapes and sizes, LEDs allow designers to customize them for their specific products. Whenever electronic devices emit light, there’s a good chance that LEDs are involved. Their low power consumption and compact size make them ideal for many applications, seamlessly integrating into designs for improved overall functionality.
This article will focus on 5mm LEDs, also known as through-hole LEDs. These types of LEDs are commonly found as indicator lights in small electronics. Operating at a much lower current of just 20 mA, compared to high-power LEDs that require at least 350 mA, 5mm LEDs are perfect for accent or confined space lighting. They can be arranged in large arrays for signage or used individually for small indicators or compact key-chain flashlights.
5mm LEDs are particularly useful because they can easily be powered by small batteries and have a long lifespan, making it simple to integrate them into various electronic devices or place them in hard-to-reach areas. Their name derives from their size, with the epoxy shell at the top measuring approximately 5mm in diameter. While these miniature light sources are easy to use, it’s important not to overlook the necessary steps for setting up LED circuits.
What is 5mm LEDs?
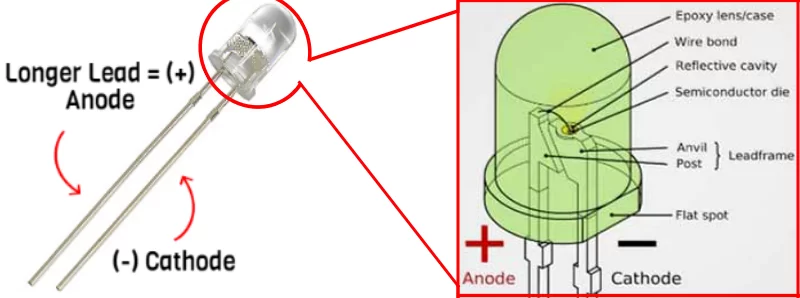
LEDs are a variant of standard diodes. A diode is an electronic component that only allows current to flow in one direction. Each diode has a specified forward voltage, which determines the minimum voltage difference required for electrons to flow between the anode (+) and cathode (-). LEDs function similarly to diodes, with the primary distinction being that they emit light when current flows through them.
A 5mm LED consists of a chip mounted on a base, which is encapsulated by a protective epoxy dome. It connects via two leads or pins that extend from the bottom. Since diodes allow current to flow in only one direction, it’s crucial to distinguish between the positive (anode) and negative (cathode) terminals. For 5mm LEDs, this is straightforward: the leads are different lengths— the longer one is the anode, while the shorter one is the cathode. If the leads have been trimmed or are the same length, you can usually find a flat edge on the cathode side of the 5mm casing.
Always connect the positive terminal of your battery or power supply to the anode and the negative or ground to the cathode. This ensures correct polarity, allowing current to flow and illuminating the 5mm LED, provided there’s sufficient input voltage. If connected in reverse, nothing will happen, and the circuit will remain closed. When checking the LED specifications, pay close attention to two critical ratings: forward voltage and forward current, to ensure the LED receives adequate power.
Voltage of 5mm LEDs
Every LED has a specified “forward voltage,” which defines the minimum voltage required for it to conduct and emit light. If the supplied voltage is below this value, the LED will remain open and not conduct. Once the voltage across the LED reaches the forward voltage, it will light up. If multiple LEDs are connected in series, the total forward voltage of all LEDs must be considered.
Take a standard blue 5mm LED as an example. According to the specifications on the product page, the forward voltage of this LED is approximately 3.4V. If we connect it to a single AA battery (which has a nominal voltage of 1.5V), the LED will not light up because the voltage is insufficient. However, if we connect another AA battery in series, the voltage will reach 3V, allowing the LED to illuminate. You might ask, “But the LED requires 3.4V!” Yes, I understand, but in practical terms, it’s acceptable to be within a few decimal points.
Current of 5mm LEDs
Now, some people believe that paying attention to the LED’s voltage is enough, but this overlooks a crucial aspect: current. LEDs will draw as much current as possible in a circuit, which can lead to overheating and eventual failure. To minimize LED failures, it’s essential to consider the rated current.
In cases where the input voltage is very close to the forward voltage, you generally don’t have to worry too much about current. Based on our experience, when the input voltage is 3V, you can power any 5mm LED except for red and yellow without concern for current issues, as there isn’t enough current from the source to burn out the LED.
In other scenarios, you’ll need to limit the current flowing through the LED. High-power LEDs require constant current drivers, while 5mm LEDs have much lower rated currents, typically around 15-30mA. You can control this current by placing a resistor in series with the LED. This is where the term “current-limiting resistor” comes into play, as it ensures that the current flowing through the circuit is kept within safe limits.
The typical test current for 5mm LEDs is 20mA, and they can handle up to 30mA, but I usually recommend keeping the current around 20mA, as this is the value specified in most data-sheets. Next, we need to determine how to find the right resistor size for the circuit to ensure the LED operates safely!
Finding the Right Size Resistor for your LEDs
Resistors come in a wide range of sizes, and finding the right one for your system requires some calculations. However, our resistor calculator can easily determine the value you need. While this tool is helpful, understanding the calculation method is valuable, so let’s go through it together. To find the right current-limiting resistor, we need to know two key characteristics of the LED: its forward current and forward voltage.
For example, we use an LED has a forward voltage (Vf) of 3.2V at its test current. At a constant current of 20mA, the LED will drop between 3.2V and 3.6V. Taking the average, we assume the LED will drop 3.4V.
In this case, I’ll use 3AA batteries in series as the power source, providing a total of 4.5V (1.5V per battery). To determine the resistor value, we need to find the voltage across the resistor first. Since the resistor and LED are in series, their voltages must add up to the input voltage. Thus, we can easily find the voltage across the resistor, knowing the LED voltage is 3.4V.
- Input Voltage = LED Vf + Resistor Voltage
- Resistor Voltage = Input Voltage – LED Vf
- Voltage Across Resistor= 4.5V – 3.4V
So about 1.1V will be dropped across the resistor. Now that we have this, we can use Ohm’s Law to calculate the needed resistance!
- Resistance= Voltage / Current (in Amps)
- Resistance= 1.1 / .02 (20mA)
- Resistance = 55 Ohms
The required resistor value will vary depending on the LED. In this example, we can assume we need a 55-ohm resistor. The closest standard size is 60.4 ohms, so we would choose that one. If you’re unsure about the resistor value, or if it falls between standard values, it’s best to select the next larger size.
Lastly, it’s important to check the power rating of both the LED and the resistor. All of our resistors are rated at ¼ watt. The necessary power rating for the resistor is determined by the difference between the LED’s wattage and the total wattage of the circuit. Using the example above, we can calculate the required power rating for the resistor.
- LED Wattage = 4V x .02A = .068 Watts
- Total Wattage = 5V x .02A = .09 Watts
- Wattage dissipated by resistor = .09 – .068= .022 Watts
A ¼ watt (0.25) resistor can easily handle 0.022 watts, so we’re good to go! Simply connect the resistor in series with the LED on the positive side, and your light setup is complete.
Output of 5mm LEDs
Now that we’ve covered the intriguing topics of voltage and current, let’s delve into what people truly care about: the light emitted by these tiny bulbs. There are various ways to measure color and brightness, so let’s explore how these diodes produce light.
LED Wavelength
The wavelength of an LED is a precise way to describe its color. Due to variations in manufacturing processes, the colors of LEDs can differ slightly, and you might see minimum and maximum wavelengths listed on a 5mm LED specification sheet. These variations typically fall within the same spectral range, meaning that if you purchase multiple batches of the same color, you may notice subtle differences—though our eyes might not detect them.
This wavelength is determined by the type of semiconductor material used to create the diode inside the 5mm package. Different semiconductor materials have distinct band structures, which in turn affect the frequency of the emitted photons and, consequently, the color of the light we perceive.
LED Brightness
Thus, the wavelength is determined by the semiconductor material, while the light intensity depends on the current supplied to the diode. The greater the drive current, the brighter the LED becomes. Brightness for 5mm LEDs is typically measured in millicandelas (mcd), but setting a specific brightness value isn’t as straightforward as it might seem.
Interestingly, this method of measuring light—candelas—focuses on perceived brightness rather than just the amount of light energy. The measurement is derived from the power emitted in a specific direction, weighted by the luminosity function, meaning that both beam angle and wavelength impact perceived brightness. Human sensitivity varies across wavelengths, which is factored into this model. This is why infrared 5mm LEDs produce no visible output, as we cannot see that wavelength. The same goes for ultraviolet and some colors like blue.
As you can see, the luminous intensity of different LEDs varies significantly. Colors typically have lower brightness, ranging from tens to hundreds of mcd, while white LEDs—and certain colors like green—can reach brightness levels of up to 20,000 mcd.
Diffused 5mm LEDs
When LEDs will be viewed directly by the human eye, it’s often advisable to use a diffuser or frosted surface treatment. Some 5mm LEDs feature a finish on their epoxy dome that softens the light output, helping to reduce visual fatigue. While this may lower brightness, it enhances the aesthetic appeal of the fixtures.
Exploring with 5mm LEDs
5mm LEDs are inexpensive and easy to work with, offering endless possibilities for experimentation. Now that you know how to power them, determine their color and brightness, and ensure the light spreads where you need it, the potential for creativity is limitless!


